Thursday, November 6, 2014

Transforming a UFO into a WIP

Remember this quilt? This is Christmas Yet to Come, the block of the month project for 2011. I loved making this quilt. I loved the over-the-top applique, all simple shapes, but oh, so many of them!

It's a large quilt, 102 inches or so square. I knew that basting the quilt could be a challenge. Buying a 108" backing fabric seemed like the way to go.

This is also the only quilt that has taken me three tries at basting to get it right. Three tries on a quilt that is 102" square.

My first fail came from a rush job at a quilt shop retreat. Because the place was packed full of happy quilters, only a couple tables, of slightly different heights were available. No biggie, right? This is not my first trip to the basting rodeo. Wrong. Puckers and pleats everywhere. Unbasting ensued.

For my second try, I switched over from my default 80/20 batting, which is white, to a black polyester batting that was supposed to be designed for machine quilting. I was concerned about bearding (when the light colored batting comes through the fabric to give it a hazy appearance), and I was hoping the loft of the polyester batt would add to the texture of the quilting. Another epic fail. This time it was incredible static cling that resulted into unruly bubbles on the backing, and the quilt weighed a metric ton. More unbasting.

Hoping that the third time would be a charm, I switched out the poly batt for wool. Wool has a gentle loft, and keeps its warmth despite being very light.

Of I toddled to the Quilted Cottage, on an off day so that there would be lots of open tables. With all the room I would need, I carefully pressed and then secured the backing fabric to the tables.

Starting in one corner, I was careful to leave enough fabric for wiggle room on the edge. I happily basted the majority of the quilt, feeling positive about the outcome this time.


But then I came to the opposite side of the quilt. Aaargh! The backing is short by about eight inches. Of course I started by kicking myself in the rear and then sitting down for a little bit of a pity party. I really couldn't face unbasting this quilt yet again. And when I measured out the extra on the opposite end I realized that it wouldn't have been enough, even if I'd snugged the quilt right up to the edges. Perhaps the quilt is a little larger than I thought, or maybe the backing wasn't 108", I bought it three years ago. Maybe it shrank in the closet, lord knows my clothes do.


In the end I decided to forge on ahead and seam the backing fabric. I started by ripping away the selvages. I had plenty of fabric left over in yardage, so I ripped that as well. The pieced edge will be cross grain while the majority of the backing is on the straight of grain. This might be an issue if this quilt were to be hung, but I'm not overly worried. I'm going to quilt the snot out of it, so the backing should be very stable.

Ripping the fabric keeps the edges perfectly on grain, This might end up being the only "perfect" thing about this quilt.

The sewing, even while being very careful, only took a few minutes. My machine has a dual feed option, which helps to prevent shirring along the seam. Otherwise,I would have used a walking foot. A seam this long, and with so much extra weight to one side, is just begging for trouble.


The proof is in the pressing. The seam was pressed open to eliminate as much bulk as possible. A seam pressed to the side can result in unexpected bumps when quilting. Thanks to the subtle print pattern of the backing fabric, the seam almost disappears.

Even though it seemed like a monumental job, it actually took about a half an hour to complete.


The quilt is now fully basted. Done and Done. Now it's time to finally commit to a quilting plan. I will begin by stitching in the ditch around the applique and the pieced elements. I'm pretty sure the center stars will be surrounded by some sort of grid work. As for the background fill? I'm open to suggestions. Really. Help!

Sunday, November 2, 2014

Let the piecing begin


This whole project started because my doctor said I need to socialize more. I am an introvert, and I have plenty of toys to keep me a happy hermit. I had a shocking wake up call when my neck doctor suggested I go with a friend to exercise class, and I couldn't think of one person that I would call. Pathetic, right? Sure, I have friends, but they are all quilting professionals who are spread across the globe.

My local quilt shop, the fantastic Quilted Cottage, holds a weekly Open Sew day. No charge, no expectations, just show up, choose a table and set up your quilty nest. This seemed to be the perfect venue for my reentry into civilian quilting life.

When I'm working on a new design for possible publication, I start by making a workbook. Since this quilt is all pieced I can work directly from Electric Quilt, printing out rotary cutting directions for each unit of the quilt.

EQ does amazing things, but there isn't a single button to push to get piecing directions. For my workbook, I've drawn the units individually. The rotary cutting print out only gives the instructions for cutting one block, and no piecing instructions. (Bwha-ha-ha, that is why you need me and other pattern designers!) So, I use these print outs to confirm my math and work out the cutting for the required repeats of the unit. In this case, I need a total of 80 of these little patches. Eighty.


Strip piecing is NOT my favorite. It's just too easy to wander off the seam allowance (forty-five inches is a long way to pay attention), and it's super easy to press pleats into the seams. The Cottage offers lightweight, inexpensive irons for their classrooms (those darned fusers make a mess of them), adding to the challenge of getting a crisp press. I'll be adding my own hefty iron to my travel kit on Open Sew days.

But, sometimes, strip piecing is the best way to go, especially for small units such as this. It only finishes to three inches.


After cutting eleventy-million segments, I'm thinking that maybe strip piecing wasn't the best choice after all. I had to measure and cut each segment individually. If I had cut out all the shapes before sewing, I could have cut multiple layers at once. Plus, it's much easily to maintain that good seam allowance over short seams. And they would have pressed out better. Hmmm. I hate it when I have to tell myself, "I told you so". It's so much more fun to tell it to others.


So, I have two thirds of the little unit sewn. It needs another segment sewn on to complete it. They need to be pressed before I go on to the next step, it will be easier to press the seams one at a time. And, I have a decision to make. Do I want to clip the seams so that I can press them away from the background (the black) for both the red and green squares? I think I should. I also think it will be a pain. Anyone who has taken a class from me (or my Craftsy class) knows what I nut I am about pressing. You can probably guess what I'll end up doing.

Friday, October 31, 2014

Easy Peasy Christmas


Two years ago, when my Sneaky Piecing Tricks book came out, as part of the promotion, I did a Take & Teach class at Quilt Market. I designed a nifty little twelve inch block to illustrate some of my favorite tips and tricks in the book. I really liked the block, and figured that I'd need to do something more with is someday.

After several hours of noodling around on EQ7, I finally settled on a design. (Do you use Electric Quilt? I've been using it since it was a DOS program, pretty much since its beginning. It's addictive fun.) Started with the basic block design and then shifted it around into different settings.


My original plan was to alternate the block with applique, but nothing I tried seemed to fit.


So I started messing about with alternating pieced blocks. After several tries, I found a design that I liked, but I didn't like how the seams fell. I try to avoid piecing the same color fabrics together, especially if I can find a way to sew it as a simple shape.

Then the "what ifs" took over. Can I let go of the idea as creating the block as a block? What if the block were to become the sashing and cornerstones, and the alternate block becomes the block?


I really like how the whole stepping stone thing is working out, it kind of makes it sparkle, Let's add some nine patches in the center of that red square, yeah, the one that I redesigned the block to keep unpieced.

But, yikes, this design is just way, way too busy. And, even though I played with adding more color variation and a third color, I really wanted this quilt to be a little more understated. I have these three fabrics that I wanted to use, no need to make things complicated. (My fabrics are not quite so garish as how these are showing in the diagrams. I'm just using stock fabrics as placeholders.) Nothing understated about this one!


Now here we go. This I like. I like how the little squares sort of sparkle, alternating the red and green makes them wink in and out. The tiny break in the stepping stones echos the crisscross in the center of the blocks. Yep, after about three hours of playing (I couldn't believe how long I had been goofing around!), this is the design I settled upon.

Of course, old habits die hard, and along with all of the messing about with the design, I also consider what will become of it. Shall I publish it as a pattern? Would it make a good block of the month, although I'm thinking it would be more of a block of the week.


I'm calling the design Easy Peasy Christmas, because I'm using red and green fabrics that are dusted with gold. But how lovely it is in all blues! (Gosh, maybe I'll need to make more than one.) I would really want to change the name so quilters will feel more free to use their own colors. Suggestions? Interested?


Thursday, October 30, 2014

First dish towels


I've been exploring the weaving process on the floor looms. The jury is still out, if I will stick with it. Just like so many creative endeavors, there is a difficult step required to get through before the real fun starts. Putting the warp on the looms in physically challenging, and must be done well or nothing good happens after it.


Weaving dish towels is considered the requisite first project for the floor loom, after, maybe a scarf or shawl. It should be rather mindless, sort of like chain piecing, but I find myself agonizing over symmetry. Arrgh! I'm not experienced enough to be able to visualize the entire towel, to make a pattern work over the length. The woven part disappears onto the cloth beam, leaving only about an eight inch section exposed. I forget what I've done, and what I planned to do.

I have a new set of towels on the smaller loom, and I'm planning to be random with these. I'm planning to not plan. There are fewer colors in this new scheme, so I won't have as many decisions to make, which is about as good as it will get. I'll let you know how long I can be random before needing to make a plan. I don't think it will last very long.


Tuesday, October 28, 2014

In between


The last few weeks have been delightfully quiet, with pretty much nothing that's newsworthy. My days have been taken up with physical therapy on my neck, and then resting until the pain subsides. I've been taking it easy, on doctor's orders, just sort of gliding through days with no real agenda or plan, something that doesn't sit easily with me.

The decision has finally been well and truly made: travel is off my docket for the duration. Instead of visiting over a dozen guilds a year, I will book only one or two. Air travel will be severely curtailed, as I just can't manage the heavy suitcases without the risk of further damaging my neck and shoulders. It is just too physically demanding for me. No matter how I exercise to build upper body strength, the damage can't be undone.

We've been sneaking up on this. Risking further damage to my shoulders by reaching around to pat myself on the back, I'm good at teaching and speaking, and I love it. I've always felt that knowing something only became valuable when I could share it. It's been a very tough choice to make.

And then there's the blog. Many of my favorite bloggers have been soul searching about their blogs. Some have changed directions, some have redefined, even renamed, and others have chosen to stop blogging all together.

It's always been a challenge for me to blog, I just don't think that I'm all that interesting. In the beginning it was just another marketing tool for my quilting career. What will it be now, if my quilting career is in the rear view mirror?

As I've ventured out into other fiber art forms, I've worried that I'd alienate my "base", the quilters who follow my projects, and perhaps, buy my patterns. I love you guys, and I hope you'll stick with me.

I've had tunnel vision while building my quilting career. But now that I'm off that merry-go-round, my interests have grown just so much wider. In the last two years I've learned how to spin yarn, weave on a floor loom, and weave tapestry. I've remembered how much I love to cook and bake, to feather my nest, to knit and read, and sometimes do nothing at all. And above all, I love to learn.

So, from now on, for better or worse, the blog will be about me, my adventures and misadventures (because who doesn't love a good failure from time to time?) I hope you'll come along for the ride. There may even be a quilt or two along the way.


Monday, September 15, 2014

A Good Day to Dye


It was something I swore I would never do. I'd given it a shot years ago, and decided that dyeing fabric was something I didn't need to do. I mean, it's not like there aren't a million zillion fabrics already out there, just waiting to be discovered and then chopped into lovely little bits. But....

Finding yarns for tapestry in a range of gradations (especially in the US), is a real challenge. In fact, finding yarns for tapestry is rather complicated all the way around, there are so many variables. Just as with fabric, the medium values are easy to find. It's the lightest  lights and darkest darks that are the biggest challenge.


Just as always, I spent a great deal of time trying to figure out how this hand dyeing thing worked. Wanting just small amounts of each color for now, I knew that I wanted to use mason jars and a canner for steam setting the dyes. Figuring out how much dye to use to achieve the desired depth of shade was the stumbling block. Different sources varied widely as to how much to use, so my first batches were way, way more intense than I was looking for.


But the colors came out so clean and bright and pure, it was still super fun to just toss the skeins in the dye and just see what happened.


After a while I just started mixing colors, adding black to skeins that came out too close in color to be useful, or blue, or red.


After my first day of dyeing, I was pretty darned happy with my yarns. It's a pretty good selection, if I do say so myself, especially considering I had no idea what I was doing! Not quite the light lights and dark darks, but hey, that just means I'll have to dye another day.

Friday, September 12, 2014

Hat Dance Hanging


Here's my Pilgrim/Roy Invitational Challenge quilt, hanging in a special exhibit at the American Quilter's Society show in Grand Rapids, MI! On my list of things to see at the show, I had to get special dispensation from the show organizers (Bonnie Browning herself took the picture) because the exhibit was labeled as no photography allowed.

Honestly, this is pretty much the only way one of my quilts will hang in a national show. Competition is just not my cup of tea. But thank goodness that there are so many quilters willing to show their quilts, or we would have nothing but vendors to see at a show.

Not that that would be a bad thing. Of course I checked out the vendors! I saw a fabric that I adored, and then didn't buy it because it wouldn't be enough to be the background for a queen sized quilt. Stupid, stupid! It would have been perfect for a smaller project. I can have such tunnel vision when it comes to purchasing supplies. Sometimes my need for an orderly stash really hampers my shopping.


I didn't see much that was new, but I did enjoy reconnecting with some old pals. I was heartened to see so many traditional style quilts and vendors. I thought that the modern quilters had pretty much run us out on a rail. But, it seems that we're still going strong, and maybe I will go back to designing new quilts and writing patterns.

One thing that did catch my attention was the brand spanking new Bernina sit-down quilting machine.  How long have we been asking for this? Only one of two machines currently in the US, I was able to sit and stitch for a bit, and it's lovely. It's quiet, and it has the capacity to use regular sewing machine needles as small as 70/10! For most quilting machines, it's 90/14 or bigger, and I know that folks do wonderful things with those needles, they've always been the deal breaker for me. But now... well, I guess it's time to start stuffing that piggy bank. They won't be available until next spring, so I'll have plenty of time to skim some cash off the grocery budget. (Don't read that sentence, Kent. I'm just kidding, really. Sort of.)

Wednesday, September 10, 2014

Rest is Not Idleness


Taking some time off to heal and consider my options is not as easy as it sounds, especially not for someone who is used to a lifetime of going at full steam ahead. Taking a step (okay, a leap) back from the physical challenges of travel, and starting physical therapy, have proved to be just the thing for my dodgy old neck and my creative burnout.


This has been my summer of weaving. I've always turned to learning a new craft when my creative juices run dry. I think it's a "making" thing. It's a new label, being a maker, but it perfectly defines me. I have been a maker all of my life, and when taking a break from making quilts, it was only natural that I should need to make something else.


The tapestry bug has bitten me, hard. I'm talking the weaving kind of tapestry, not the embroidery kind. I've taken two tapestry classes this summer.

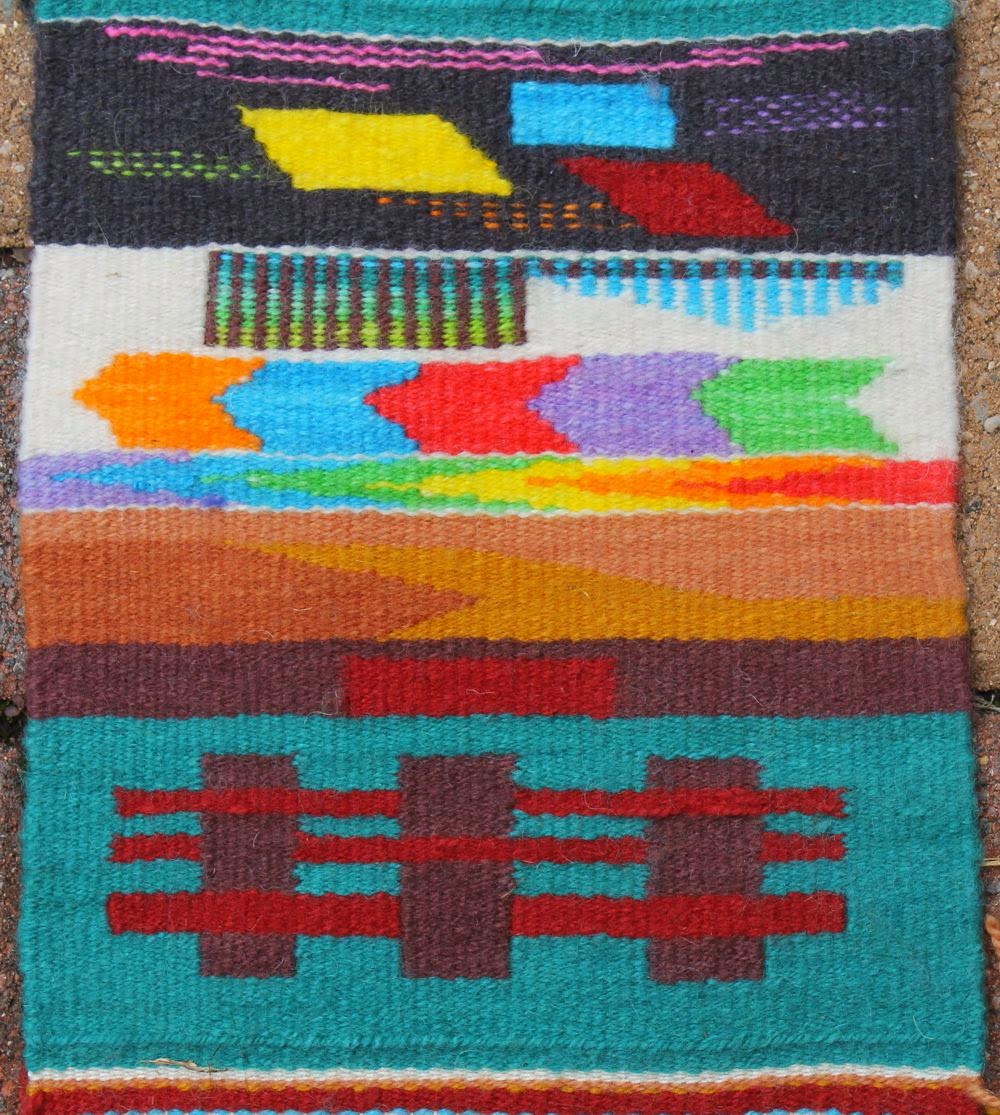
Starting last spring, Rebecca Mezoff offered a three part, comprehensive online tapestry class. She's just charming, and the class format included lots of personal interaction. I highly recommend the classes. The sample to the left is from one of the early parts of the process.

In August I attended the Michigan League of Handweavers' annual workshop retreat. What fun! Just as in quilting, weaving is bent and shaped into so many intriguing art forms, just waiting to be explored.

While there, I took a tapestry class from Nancy McRay. It was awesome! The sample above is from her class. Three days of the quiet strumming of tightly warped looms, extremely individualized lessons and wonderful encouragement, were a balm to a healing soul. (Not to mention the nightly hugs from grandbabies, the retreat being in their town.)


And here is my class final project for Rebecca's class. That's a pumpkin growing there, just in case you couldn't tell. The tapestry is only ten inches wide, so I'm having to edit, edit, edit to try to tell the story. I'm really pleased with some of it, other parts, not so much. I'm still thinking of spaces as in fabric for applique, and that's holding me back a bit. But I'll get there, probably in about a million years, but then, if it could be mastered in a day how inspiring would that be?

Monday, August 11, 2014

The Academy of Applique

At last! The big reveal. This is the applique project that saved my sanity during our crazy month of family comings and goings. I've been invited to teach at the Academy of Applique in Williamsburg, Virginia! If that's not cool enough, I'm going to be teaching two multiple day classes, giving us a chance to really explore and savor the applique process.

 This is the class sample for the three day workshop at the Academy of Applique. The class descriptions are on line now and registration will open on September 2nd. This class is called Gather Ye Rosebuds, and in the three days of class we will have the time to play with design and color. We'll concentrate on the more flexible, modular aspect of my applique technique in this class. I'll have dozens of preprinted flowers in various sizes and shapes with which to fill our vases. We'll even have time to design and sew our own custom backgrounds to give our bouquets just the right setting. I had so much fun playing with color values and shapes I am already planning another version.


I will also be teaching a two day workshop, Autumn's Bounty. This class will be a great introduction to the basic "Hand Applique by Machine" technique. We'll have time to audition and select just the right fabrics to show off our lovely harvest. (I'm in love with the grapes.) I'm expecting that we will be able to go home with our applique pretty much finished, which is rather amazing for applique workshops, if I do say so myself.
As I've mentioned before, I've really cut back on my teaching schedule, and I haven't done much teaching on the east coast. The Academy is a wonderful gathering of all things applique. Come on all you applique artists, this is the place to bond with your people, learn new things and generally have a great time.


Monday, August 4, 2014

Time Travel

Do you ever wish away time? Do you try to mentally project your thoughts to a date and time where life will return to what ever is normal for you? I have to admit that I do. It's not so much that I'm wishing away time, I know life is too short for that, but it is sort like casting out an anchor for getting through challenging times. In a way, it's like envisioning my victory over the current situation.

It's been like that for the past month. I've tossed a marker to today, knowing that our wonderful, but hectic, family gatherings will have been enjoyed and survived. Ironic, isn't it, that not too long ago I was deep in the throws of empty nesting, and now I look forward to being back to my quiet life. That's the thing about life, I suppose. It's always changing. Normal really is just a setting on the washing machine.

Our Kansas kids were back in town for about ten days. While we were home base, they were here to celebrate weddings and reconnect with friends. We saw them in the mornings on their way out the door, and sometimes in the evenings as they regrouped for nighttime activities. We did have a lovely time on the drive down to Detroit Metro, for their return flight home. Yeah, I cried a little when they left. It's a mom thing.

Our grandchildren stayed with us for a week. They are now seven and four, and delightful, well mannered kids, and exhausting. I don't know how folks our age manage young children of their own. But, we had a great time together, and I'm grateful that they live close enough that we can be a part of their lives.

Of course, in the middle of all the excitement, I had a class sample to finish. As usual, I stressed out about it way more than necessary, but it too, is done and gone. (More on that in a couple of days.)

It won't be back to happily boring though, for a few more weeks. I'm looking forward to three days of tapestry workshop this week, where I get to be a student. And there will be autocross for Kent. From there we will blissfully slide into our familiar routine of work and play. Not that I'm counting the days or anything.

Wednesday, July 16, 2014

How it begins


I've been invited to teach a three day applique class next March. Three days! I'm so used to trying to cram everything I know into just six hours that three days seems like an incredible luxury. I'm excited to be able to devote time to design, color theory and embellishment as well as technique. With this in mind, I've set out to develop the class sample.

My idea is to offer students a variety of flowers (you were expecting something else?), in several shapes and sizes, and allow them to arrange their own bouquets. The challenge is to present enough choices to keep everyone happy, but, at the same time, I don't want to offer so many choices that students can't make good progress on their samples.


Here's my preliminary layout, with some of my fabric choices surrounding it. I've gathered up three different styles of main character flowers, there will be three of each in the handouts. I've used one of each here as a sort of tease, but also because it is this sort of mish mash bouquets I have been cutting from my garden.


So far, so good, right? The vase isn't showing up well here, it is actually a little more complex that what can be seen. As I'm working on the glue basting I'm also considering what sort of embellishments I will add to the shapes. I may do a little ink work on the yellow rose, but I think the zinnia and the painted daisy will need some french knots, at the very least.


Moving on the accent flowers, it's there that I hit a snag. That's my little finger in the picture. That circle is less than a quarter of an inch in diameter. I want to challenge my students, not frustrate and discourage them. Glue basting shapes this small takes skill and patience. Most of my students would probably be able to pull it off by the end of the second day, but I'm thinking that I want to keep this class fun and gratifying. So, I'm back to the drawing board to simplify and enlarge some of the smaller elements. I think I'll leave some smallish ones in place, for those who really want a challenge.

I'd love your feedback! What would you like to learn in a three day applique class? Would shapes this small scare you off, or reel you in? Would you rather work from a proscribed pattern, or would the idea of designing your own bouquet excite you?

Tuesday, July 8, 2014

A summer for gardening


It's been a lovely, quiet summer so far. The weather has been mild, a good mix of happy sunny days and charming all day rains. The flower gardens are really coming along, although I still have some major weeding to do on a couple of them.

Our hard winter was really tough on my perennials. Quite a few didn't survive, including several of my roses. I put off weeding and planning to see what really was gone, and what was just taking its sweet time about coming back. I've had a few nice surprises, especially from roses I was sure were gone.


The pond also suffered from the hard winter. We lost nearly all of our fish. The ice was nearly three inches thick when we finally hefted it out of the pond, near the end of April. We'd been waiting for it to simply melt away, but our cool spring prevented that. Despite having lots of aeration, I think the fish suffocated. We've added three new fish and a few new water plants. and I think it is looking well again.

 
Gracie is learning that grass is good for sprawling, but mom gets super mad when she lolls around on the flowers. I'd lay prickly rose branches between the plants to discourage her, but they seem to be her especially favorite to chew. I catch her swiping them out of the weed cart all the time.

The gardenia is now constantly in bloom, adding its scent to the lavender and roses. I've left the few milkweed volunteers, hoping to coax a monarch butterfly, or two. I haven't seen a single one so far this year.


Thursday, July 3, 2014

And now for something completely different

Part Three: Learning Curves
As the previous posts have suggested, I'm learning to weave. I'm taking a tapestry weaving online class from Rebecca Mezoff. She is charming, delightful, and an excellent teacher. I've learned so much over the last couple of months, and not just about tapestry.

It turns out that I am the sort of student who would challenge me as a teacher. I wanted to know all of it, and now. In the first few passes of yarn through the loom, I knew that I was hooked. This is a new way of playing with color, and my mind just sort of boggled at the possibilities.

Part Two: Demi Duites, Pick and Pick and Weft Joins
I chafed a bit when I learned that we wouldn't get to angles until part two, and curves would remain a secret until part three! I wanted to know it all, now. I will admit to some very ungracious grumbling. And then I recognized it. I'm that student. On the one hand, it's sort of a miracle to see from the teacher's perspective, seeing that moment when the door to all the new possibilities opens up in a student's mind, when a student totally gets it. On the other hand, it's super hard to contain the excitement and discipline myself to learn to crawl before trying to fly.

When it came to tapestry, I got it. I am the sort of person who is used to catching on to things quickly, at least anything involving needlework. It's in my dna, just as much as my green eyes and freakishly long legs. But tapestry is not needlework. There are no needles involved at all. There is an entirely new vocabulary to master, not the least of which is the interaction of warp and weft.

Part One: Hatching 
We're only part way through part three, and I'm excited to see what comes next. I can't say enough good things about Rebecca's class. It's part self-directed, but with a great deal of interaction with Rebecca. She responds to questions very thoroughly, sometimes even creating new videos to clarify a point for a struggling student. If you are at all interested in tapestry, check it out. You won't be sorry.


.


Tuesday, June 3, 2014

It's called OLAD

Obsessive Loom Acquisition Disorder. OLAD. I knew about the malady, but never expected to be infected so quickly. Looms have very specific functions, designed for specific styles of weaving, sort of like the way sewing needles are designed for specific tasks, only taking up way, way more floor space. And I've got it bad.


My OLAD was still manageable when I had just the Baby Wolf and the Mirrix, each designed for specific purposes.

This sweetie is a terrific loom, but it has its limitations. It's considered a portable loom, so it's not quite sturdy enough for weaving rugs. (With all this fabric around me, I see many, many rag rugs in my future.) And, it only has four shafts (patterns are made by threading the warp through different shafts), the more shafts a loom has, the more complex the patterns can be.


I have woven several things on this loom, not the least of which is the beautiful overshot pattern to the left. With careful threading of the shafts and repeated sequences of treadling, marvelous designs can appear.

It was the "mathyness" that drew me to quilting originally, taking just simple bits of algebra to cipher out an entire quilt. Weaving is also mathy, and I love it!


But just as, after a time, all those straight lines in quilting designs began to chafe, so it is with weaving. So, I needed a tapestry loom.Tapestry weaving lets me draw with yarn. It's the weaving world's equivalent of applique. I am taking an online class from Rebecca Mezoff, and so far we are only up to geometric forms. The class has been just marvelous, Rebecca is a terrific teacher.


This is my final project for Part One. Curves aren't actually covered until Part Three, which is next month, but I couldn't help myself. They were supposed to be circles, those blobs, but at least the top one ended up a convincing oval. Even the triangle was a bit of stepping out, we're only just now getting the the lessons in triangles, in Part Two.


And now to the OLAD, one more type of loom, this one a for-real floor loom, a heavy duty loom that can handle rug making, and also with more shafts for more intricate patterns. I've been watching for a used loom to come up for sale nearby, and one did, just last week.

Introducing the Norwood. These looms have a delightful Michigan history, built by a furniture maker out of cherry wood.

She has eight shafts, and a weaving width of almost forty inches. She also has a sectional warp beam (it's the spiny looking thing on the left), so I'll need to learn how to work with that.

I wish I could say that I was done buying looms, but I fear I have a couple more in my future. I'm certain that I will eventually want a larger tapestry loom, and I'm also considering a band loom, to weave intricate, skinny bands of color. But that's it, really, who actually needs a loom with more than eight shafts, or hooks up to a computer, or is just bigger? Nah, I'm done with OLAD, really I am.